fairosf

Posts Tagged ‘Scenic Design’

“Models and Sarcophagi” from Randy Wong-Westbrooke

In Assistantship on June 23, 2015 at 8:15 PM

SarcophagusWWRandy

Last week in the studio I completed a ¼” Bowmer model box and we’ll hopefully find some other opportunities to get me back in there when I’m not needed in the paint shop. It was so great to get back into model building having not done it for about six months. It really got me thinking about the upcoming designs I have for my senior year at Ithaca College. First is Anon(ymous) by Naomi Iizuka and then Tom Stoppard’s Arcadia. Rick Anderson showed me the software he used to fabricate complex model pieces on the printer and if I can figure out how to use within the next year, I really ought to explore the resources at Cornell University right across town in Ithaca to see what 3D printing equipment they have in their architecture department and see if I can utilize it! Rick’s recommendation to learn more CAD software is daunting, but it will make me more marketable so I might as well get the student deals while I still can!

This week I’m back in the paint shop and all of our forces went towards painting the two sarcophagus’s for Antony & Cleopatra. A lot of meticulous work was put into them taping them out, applying reeds to add dimension, gold leafing, and painting the multiple colors in a particular pattern. We got the point where everything was covered by the end of the work-day on Tuesday and I can say that they still looked amazing at the preview that evening. Going to the preview in the Elizabethan Theatre and seeing the half-timbering made me want to go back to London. The last show I saw during my semester there was Romeo & Juliet at Shakespeare’s Globe. I stood in the queue for two hours to get a returns ticket and paid five pounds to be a groundling right at the foot of the stage. The show went on even with consistent rain and I was prepared to outlast another Shakespeare in the rain, but being in Row L meant my seat was dry! The rain did clear up anyway and it was incredibly satisfying to see some of the work I’ve done finally be onstage.

“Three Royal Thrones” from Erik LaDue

In Erik LaDue, Fellowship, Richard L. Hay Fellowship, Scenic Design on January 19, 2014 at 1:44 PM

Erik Ladue 1.15

And so we are settled!

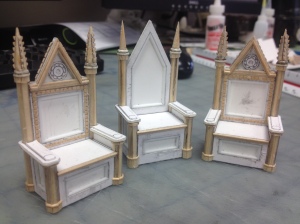
Painstakingly, I have crafted thee royal thrones. I feel like I’m the king of the ½” world! I’d take a seat on my royal seats, but then I’d undo a three days of labor.

While working on my micro work, I’ve been keeping an eye on the macro. I’ve been interviewing established designers to get an idea of what I ought to be working towards after my tenure with OSF is completed. Most narratives have a similar spine: work hard, designing as often as possible, then go get a Master in Fine Arts at a school that connects with you. It’s fairly simple. I’m surprised to find that many designers currently in active, established careers did not do any sort of internships or fellowships in the gap between their undergraduate and M.F.A. programs.

I’ve done three so far.

Of course, no two paths of life are the same. But it does give me pause to think: “All I have to do is keep designing?” Bring prolific in art makes a career out of it. So what is OSF in relation to what I was always doing, designing? Back to my royal thrones: I would never have conceived building anything like these before coming to OSF. I probably would have given up and moved on to another project, avoided having to construct these model pieces all together. Further expanding my mind are the technological advanced that OSF is utilizing: I already know that it is vital that I master a 3-D computer drafting program. It would also help to start saving up for a 3-D printer…

If nothing else, I will leave OSF with a higher bar for excellence.

“Details” from Erik LaDue

In Erik LaDue, Richard L. Hay Fellowship, Scenic Design on January 16, 2014 at 12:49 PM

Erik LaDue 11.27

The magic is in the details.

So, of course, that’s where the work is.

I’ve spent two days applying molding to the carriages of  ½” scale stairs. That doesn’t sound like much, but it makes a huge impact when the whole project comes together. With tweezers in one hand and an X-acto blade in the other, I’m playing Cosmetic Surgeon for Shakespeare’s Richard III.

It’s funny sometimes when I need to use the Scene Shop facilities in order to fabricate materials for these mini-masterpieces. I’ve become familiar with using the table saw to rip down life-sized lumber into scale posts for my tiny handrails.

There are moments of spectacle present in the craft of model building. In the design studio, once someone has finished a project for one of the models, there is a brief moment of “Check out what I made in miniature….”A phone, a cashier, an umbrella, etc.

It’s all about maximizing communication to everyone else in the production, and we’re taking every detail, every piece of the magic, seriously.

“One Brick at a Time” from Jose Rivera

In Internship on January 30, 2013 at 8:36 AM

Jose Rivera Photo Week 1

Beginning my internship was somewhat intimidating to me since I don’t have any background experience in scenic painting. However, after being in the shop the first day and after getting to know the paint crew I was more at ease because of the support they gave me. Overall, my internship experience for the last month has been great. Time seems to just fly when I’m in the shop working on something new. It impresses me and fascinates me the amount of detail and hard work the paint shop invests in each piece for the set.

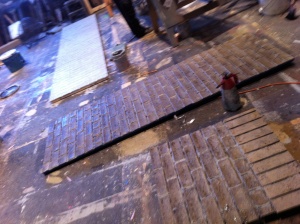
The first things I began working on were the brick walls for the set of Two Trains Running. The first step I was taught was texturing the brick in order to add more dimension to make them appear more realistic. After that, the bricks were primed with a grey color and then each brick was painted one by one with a red/brown color. The bricks were also given highlights and once they looked like realistic new bricks we then began the aging process. A very translucent wash of dark grey was then brushed and splattered to all the bricks, which gave them a more worn look.

This process will be very useful to me in the future, not only because I will be able to use these skills as a scenic painter, but I will also be able to use this knowledge in my own artwork. I truly enjoy working with everyone in the Scenic Paint Department and I appreciate them taking time to teach me new techniques in scenic painting that I do not know. Being surrounded by humble professionals who don’t mind helping me out motivates me to keep striving to improve and leaves me with deep and meaningful appreciation.

“The Things You Won’t Ever See” from Julia Welch

In Assistantship on February 10, 2012 at 3:36 PM

What I’m enjoying most about working in the scene shop are small projects that require some sort of creative problem solving. I like being given a task and told to figure out how to best create the piece. The first one I did was an arched piece to be added on top of the ANIMAL CRACKERS portal. I was given measurements, but then pretty much let free to build it as I pleased. I finally feel like I’m comfortable enough in the shop to work as I want. I can grab lumber and play with the scraps. I can wander to and from, in and out of the theatres (well not wander, more move with a purpose). I can confidently use most of the machinery without having to ask for help or permission. And I feel ok if something doesn’t go exactly right.

My very first project on day one was to cut these strips of fabric that will drop from the ceiling and indicate rain in THE WHITE SNAKE.  It’s a beautiful design and a cool concept, but a pain to create. I used this light blue poly silk called voile. The first problem was that the edges of the fabric fray like crazy when it’s cut, and the designer doesn’t want to surge the sides. What the carpenters came up with was using a hot knife that burns as it cuts so the poly melts and seals off the edges as it goes. But it took a long time and it was nearly impossible to get a strait line since these things are 30 feet long!

There was not enough room in the shop, nor clean space, to lay out the fabric and work so Chris (the other scenic carpentry assistant) and I were set up in a hallway over in the New Theatre. Make use of wherever you are, I guess. We cut some masonite stencils, but it still took about forty minutes per piece and we had to make 32 of them. It was a long first few days!

The sheets are so tall and have to be rolled up every night, or between changeovers. It’s a time consuming process so I was also tasked with finding a way to wind them up easily and quickly and simply.

I ended up building a piece that gets mounted to a wall that will hold a slotted dowel. The fabric can be loaded on the dowel and then any phillips screw gun can wind it up.  I made a few prototypes and played with different modes of adhering and releasing the fabric. It’s funny to think I spend a bunch of time making something that will never be seen by an audience, but will save the crew hours of time.

I ended up with a design that worked, and worked well enough that I was asked to make a few more of them!  It was great to see all sides of a project from start to finish.  And I liked the freedom to play, to be creative, and to experiment.  I hope there’s more of that down the line.

“A Pocket Sized Enchanted Carriage” from Tatiana Kuilanoff

In Fellowship on February 10, 2012 at 3:12 PM

When it comes to model making, rules and guidelines are virtually nonexistent. Yes, books are sold giving tips and advice on how to construct a “realistic” looking brick wall or a standard dining chair in a variety of scales and sizes…but sometimes these instruction manuals don’t provide all the answers. From time to time, you get that one project that is so complex and difficult in function or shape that you don’t know where to begin.

In short, you’re stumped.

You sit there at an impasse, looking down at a scrap pile of paper, glue, tape, a variety of wooden sticks, blades, modeling paste, etc. and you wonder why your dumb manual didn’t mention how to build this particular thing. You think, “How do I do this? Where do I even start?”

It can be frustrating at first and make you momentarily insane, but honestly, it’s one of the more exciting feats one can take on when building model pieces. Why you ask? Simple- because it allows you to be creative and use your imagination.

I encountered such a scenario myself not too long ago. The challenge: building a ½” scale model of Cinderella’s Pumpkin Carriage. Sounds simple enough, that is until you look at it more closely and try to figure out how to build it. Who knew a pumpkin had so many grooves and curves! Initially, I hadn’t the foggiest idea how to build it. All I had were the basics: paper, glue, modeling paste, sandpaper, blades and who knows what else. Consequently, this project was going to be one big experiment.

I crossed my fingers and hoped for the best.

I started off by cutting bits of paper and gluing them together to form a globelike structure. However, at first it looked nothing like a pumpkin (more like a sad little scrap ball put together). So then I whipped out the modeling paste and smothered my paper globe. This part took a bit of waiting time because everything had to dry before you could add more layers. Nevertheless, it showed promise as grooves of a pumpkin began to form.

After what I deemed enough paste (didn’t want to get too putty happy), I sanded down the structure to give it a smooth finish.

Putting aside the main body of the structure, I began working on the wheels of the carriage. Wheel spokes, the thickness of floss, were sliced from wooden dowels while the wheels themselves were cut from a variety of cardstock. Once the wheels were done and the pumpkin body completely dry, I began to gold leaf the pumpkin carriage. (This was the most enjoyable part because I had never gold leafed before. It was quite exciting!)

Taking all the parts and pieces, I finally glued the structure together and miraculously, Cinderella’s Pumpkin Carriage was born.

…This project ran the course of a few days, but I was most relieved when I finished it.

Looking back, this project initially proved itself quite challenging. No instruction manual. But because of a bit of creativity and imagination, I managed to successfully build Cinderella’s Carriage. So let that be a lesson to ya…if there’s a will (plus a bit of imagination), there’s a way.

FAIR 2012

In Assistantship, Fellowship, Internship, Residency on February 3, 2012 at 11:56 PM

Hello FAIR 2012!  It’s going to be such an exciting season here in Ashland.  Not only are there eleven amazing shows to be a part of, but any number of theatrical opportunities!  Be sure to follow us on facebook as we embark on this remarkable adventure! Tickets are on sale now – Previews begin  February 17th